Pier 1 Imports Catalog Furniture Pier1ToGo Product Details - Fuzzy Teal Papasan Pad
I had been looking for a new cushion for my Papasan Chair and was pleasantly surprised to find a soft and "fuzzy" version--finally~!!! These chairs are fun, but lets face it, we have to be able to clean them easily too. I have found over the years that fuzzy, or nappy fabrics, like velours, velveteen, etc., hold up better to everyday use as far as dirt is concerned. Not only do they not show every little bit of schmutz and smudge, but are also easier to clean. Usually a moist white washcloth with a tiny bit of soap, or Spray-and-Wash, works like a charm.
Tuesday, February 14, 2012
Monday, February 13, 2012
Cabinet doors, part 2
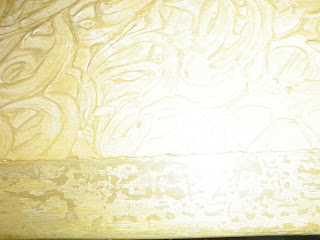
Here you see the 'high-tech-tools' used to create the design in the joint compound!
It is important to remove the tape from the doors before the compound dries since it will break and chip when hardened or the tape will stay on your door permanently.
It is important to remove the tape from the doors before the compound dries since it will break and chip when hardened or the tape will stay on your door permanently.
Cabinet doors
After painting the edges sage green, letting them dry for a day, then taping them off with painters tape, and applying drywall/joint compound to the middle, (removing the tape immediately before compound dries), and doodling a pattern that pleased me into the compound, I started playing with the paint finish.
I painted the swirly patterned compound in a very light sage green and after letting it dry, I went over it with the same dark sage green that I had used on the edges of the doors, using a dry brushing technique and a rather small brush. That didn't turn out well. The brush covered to much of the non-raised areas with the dark green, leaving blotchy and messy looking. Therefore I used a bigger and wider brush and tried again.
That was better. Still not pleased, I applied a layer of HIGH GLOSS Polyurethane, knowing that it would pool over the SEMI GLOSS Latex Paint. After letting this dry for several days, I used the soft/yellow side of a damp kitchen sponge and dipped just the edge of the sponge into the light sage green, and rubbed it all over the door. Then I repeated the process with the dark sage green, which gave me the desired effect. The 'pooled'
HIGH GLOSS showed up in three different colors. Dark green where the HIGH GLOSS coat covered, light green in the pooled, and a medium green in the pooled areas. Last touch is putting on new knobs and "Voila," a pretty new face lift for old beat-up cabinet doors.
I still have to put the old hinges on (which do not look pretty nor match), until I have the budget for new ones, that is, if I can find some that I like.
Friday, February 3, 2012
REPAINTING, REFINISHING, and RE-TILING
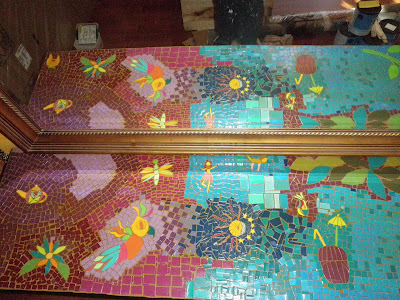
 Repainting, Refinishing, and re-tiling the sideboard is today's mission. Above and below are shots of the sideboard before the make over. My children and I made this mosaic out of cut up paint chip samples. The problem with those, however, is that they roll up and I did not anticipate this. I used construction paper before for similar project and that worked well.
 I was a little sad to cover up my children's artwork, but it just would not fit with my new, and much calmer, theme.
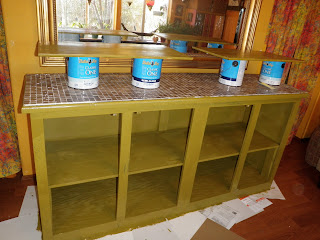
Above is a view of the front, before the refinishing. Below is the "in progress" shot.
As you can see, all the colorful art is covered by glass tile, which I snatched for only $ 3.98,- at LOWE'S. The paint is by Dutch Boy, which has a build in primer. I will put on the second coat today, and tomorrow I plan on refinishing the front of the doors.
Wednesday, February 1, 2012
Mirror Furniture
Mirror furniture are back! If you have browsed through some of your local high-end furniture stores, or if you been at Pier 1, T.J. Maxx, or even Ross', then you have seen the mirrored vanities, coffee tables, end tables, and night stands. The problem with those pretties is that the mirror pieces easily get damaged. One time of accidental bumping into the said piece can ruin your entire investment since these furnishings will cost you a pretty penny. So why not make your own? Except you want to use small pieces and use the mosaic technique. This way if one of them get damaged, you can either life with it (since it want be so noticeable), or carefully replace the damaged piece. The picture above shows one of the two closets I am working on. I have to finish the other two closet doors today and then the adhesive needs to dry for 48 hours before grouting. After that, I wills sand and repaint both closets.
Also, I made a Walmart trip yesterday, because I ran out of Mirror tile, and I was surprised to find that the prize for a 6pack of 12x12 mirror tiles are only $ 8,54.- rather than $ 9.99.- which I had quoted you all yesterday.
Here is another example of what you can do with mirror tiles. I my youngest daughter's bedroom- some 'free-form' walart with which she happily helped. Tomorrow I have some more to show you. YES, I am a sucker for mirrors ;)
Subscribe to:
Comments (Atom)


