Friday, April 13, 2012

Location, Location, LOCATION!!!


Location, Location, LOCATION!

When relocating, or simply moving from one end of town to the other, location is crucial. The area your potential new home is in, largely determines the value of the home. Are the neighborhood homes comparable in value? Do not buy the biggest house on the block if you are looking to invest wisely, go for the fixer-upper if you are looking for financial gain. The biggest house on the block will usually re-sell for the amount of the lower priced neighborhood homes, but the fixer-upper, (after being fixed up), will yield the higher price compared to your initial investment.
Did you meet the next-door neighbors? If they are nice, quiet, and friendly during the day, drive by a few times at night before you buy, and see if those same neighbors are not turning into unruly noisy party animals.
Check out the school district, as well as transportation, if you have children.
How convenient is the home to your work, grocery store, or hospital? Are there airports of train rails nearby? If so, keep the potential noise level in mind. If a price sounds to good to be true, it usually is. There is always a reason for a low selling price or an over eager seller. Turn into Sherlock Holmes and investigate!
Go by the home you planning of purchasing after a strong rain, or snow melt, to examine what the ground conditions around the home are like. A yard that looks great and problem free during dry periods can quickly turn into a small pond, or regular swamp, over night.
Is there an Orchard nearby? You might love the beauty of those trees, especially when in bloom, but keep in mind the likelihood of insecticides being sprayed. This could mean years of suffering for individuals who are more sensitive, or even allergic, to those chemicals and toxins.
For all these, and many more, reasons, it is vitally important to consult with a reliable, reputable, and honest real-estate agent. See my link on the importance of choosing a good agent.

Staging Your Home   -- part 3

Update, Up-trade, Up-sell!!!

Take a tour through your home and pretend to be a stranger in it. What do you see? Is there an Austin Power Shag Rug in your living room or bedroom? Do you see leftovers from the ‘Flower Power’ era of the 60s like lava lamps, macramé, or psychedelic paraphernalia? Unless all your potential buyers are Hippies, it is time to say good-bye to the past and embrace a new, less dated look.
What about the comforter on the bed? Is it time to exchange it with an updated spanking new looking one?
 How about the shower curtain, is your potential buyer starring in awe at the life size Elvis, duck, or Batman, when entering your bathroom? Again, tone it down, think of neutral, light and bright colors that would work for the femme fatale, the single guy, or the family of five alike.
Did your creativity entice you to sponge paint the hallway in flamingo pink, stencil the kitchen with geese, cows, or daisies, or paint a scene from Winnie the Pooh on the kid’s room wall? If so, give your walls a fresh coat of paint, but --- keep it neutral.
What is neutral? Good question, I am glad you asked. Neutral does not automatically mean white or beige, but it means that any décor, any taste, any type of life style can live with those colors. Blues, greens, and even pinks, as long as they are within the gray range, meaning the toned down version, are qualified as neutral colors. By the way, the hottest trend in decorating right now is gray. Gray with turquoise, gray with orange, gray with green, gray with purple, you get the idea. As long as the ‘loud’ colors are accents that is! What does this mean? It means to use oranges, turquoises, purples, etc. in small and removable amounts like throw pillows, blankets, and art, even in fresh flowers and candles. This way, any possible purchaser can mentally swap out your stuff for his, or hers. And after all, that is the goal, to find a new owner for your home. Thinking of your new dream home will make it easier to tear your heart away from the old home in order to help you to stage your home for other peoples tastes and reserve your individual savor for the next place.

GREEN ACCESSORIES with GRAY BACKDROP

ORANGE ACCENTS ON GRAY
PURPLE, GRAY, WHITE, & NATURALS
If you have any questions or concerns about getting your home market ready, feel free to pose those to Rocky or myself, we will be happy to assist and help you any way we can.


Staging your Home – part 2


One thing, that is often overlooked, but is extremely important, is fragrance! Does your home smell fresh and clean? Even though not everyone has a bloodhound nose like I have, nothing is turning potential buyers off faster than nasty odors. If Fido had an accident on the carpet, make sure you obtain the proper cleaner to neutralize the odor. If you love boiled eggs, cabbage, beans, etc., make sure these odors do not still linger in the air. Nothing beats the impact of fresh air, so, do open windows and air the place out on a regular basis. I know, sometimes that is easier said than done, especially when it comes to dealing with teenagers in your home. ;)
            Baking cookies, or fresh bread, while clients walk through your home will instill a pleasant ‘homey’ feeling in them. Having a pot of water with some cinnamon sticks and orange peels simmer on the stove will further freshen the air and provide an inviting atmosphere.
            Having fresh, not fake, plants throughout your home also helps to clean and purify the air, as well as provide a neutral, lush, and inviting backdrop for showing off your home in its best Sunday attire.
            A few scented candles here and there can add even more to the air quality, as well as provide beautiful ambiance. However, everything in moderation, too much scent can affect allergy sufferers negatively therefore BEWARE!
           

Home Staging For Maximum Profit and Quick sale!


Staging YOUR Home For Maximum Profit -- (Part 1)

When potential buyers come to your property, what do they see? Are they being greeted by diseased or dead plants, by scuffmarks on the front doors kick plate, peeling paint on the trim, or smudges from Fido’s nose on the glass? Do they have to stumble through bags and boxes of yard sale items you meant to deal with months ago? Are you finding yourself apologizing for the untidiness if unannounced visitors come to your home? If so, then it is time to eliminate ALL cause to warrant apologies. Clean, de-clutter, and if necessary paint, your front door, put a new doormat down, invest in a couple of planters with lush plants, (in a color that compliments your house, NOT clashes with it!), to frame your entrance, and maybe add new hardware, updated lighting, and/or a new house number sign. GET RID OF CLUTTER! It cannot be over emphasized that “less is more” when it comes to selling your home. Clean out shelves, closets, drawers, and cabinets. YES, buyers will open those to get an idea of how much storage space they will have. Take the exercise bike, Fido’s bed and toys, and the collection of knick- knacks, (no matter how valuable or beloved), and put them into storage. Not everyone shares your love for Hummel figurines! Potential buyer want to envision themselves living in your home, in order for them to do this, provide them with a clean, neutral canvas. Go through all your DVDs, CDs, Videos, Games, etc. and reduce, reduce, reduce.
The same is true for your furnishings, put grandma’s hand-me-downs into storage. The bulky recliner in your ‘Man Cave,’ the sewing machine and piles of craft items from mom’s corner, as well as excessive children toys, etc., pack these items up and put them into storage. With storage I mean, rent a storage unit, compared to the quicker sale of your home and getting more money for it, this small investment is well worth it, because what is true for your house is also true for your garage, basement, and attic. Storage is on the top of every buyers list, therefore all the before stated rules apply here too. Organize, clean, and de-junk your garage, basement, attic, and any other part of your property, including garden sheds, wood shops, etc.
If you are a passionate tinkerer who has a collection of cars, bikes, tractors, etc. sitting on your property that you are ‘fixing up,’ (yeah, you guessed it!), sell them or tow them to a different location.
            What about papers, magazines, counter tops, bathroom clutter? Empty counter tops. Move counter top appliances out of sight. In the bathroom, take all the make-up, shampoo bottles, blowdryer, curling iron, shavers, etc. and of the counter tops, as well as bath tub rim. Put out a bowl of fresh fruit in the kitchen, some fresh flowers around various areas of the house and a few scented candles in the bathroom.

Tuesday, February 14, 2012

Pier 1 Imports Catalog Furniture Pier1ToGo Product Details - Fuzzy Teal Papasan Pad

Pier 1 Imports Catalog Furniture Pier1ToGo Product Details - Fuzzy Teal Papasan Pad 
I had been looking for a new cushion for my Papasan Chair and was pleasantly surprised to find a soft and "fuzzy" version--finally~!!! These chairs are fun, but lets face it, we have to be able to clean them easily too. I have found over the years that fuzzy, or nappy fabrics, like velours, velveteen, etc., hold up better to everyday use as far as dirt is concerned. Not only do they not show every little bit of schmutz and smudge, but are also easier to clean. Usually a moist white washcloth with a tiny bit of soap, or Spray-and-Wash, works like a charm.

Monday, February 13, 2012

Cabinet doors, part 2

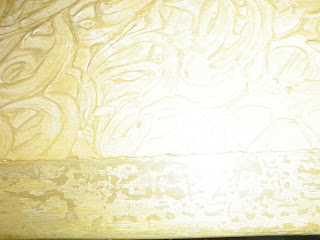
Here you see the 'high-tech-tools' used to create the design in the joint compound!

It is important to remove the tape from the doors before the compound dries since it will break and chip when hardened or the tape will stay on your door permanently.

Cabinet doors

After painting the edges sage green, letting them dry for a day, then taping them off with painters tape, and applying drywall/joint compound to the middle, (removing the tape immediately before compound dries), and doodling a pattern that pleased me into the compound, I started playing with the paint finish.
I painted the swirly patterned compound in a very light sage green and after letting it dry, I went over it with the same dark sage green that I had used on the edges of the doors, using a dry brushing technique and a rather small brush. That didn't turn out well. The brush covered to much of the non-raised areas with the dark green, leaving blotchy and messy looking. Therefore I used a bigger and wider brush and tried again.
That was better. Still not pleased, I applied a layer of HIGH GLOSS Polyurethane, knowing that it would pool over the SEMI GLOSS Latex Paint. After letting this dry for several days, I used the soft/yellow side of a damp kitchen sponge and dipped just the edge of the sponge into the light sage green, and rubbed it all over the door. Then I repeated the process with the dark sage green, which gave me the desired effect. The 'pooled'
HIGH GLOSS showed up in three different colors. Dark green where the HIGH GLOSS coat covered, light green in the pooled, and a medium green in the pooled areas. Last touch is putting on new knobs and "Voila," a pretty new face lift for old beat-up cabinet doors.
I still have to put the old hinges on (which do not look pretty nor match), until I have the budget for new ones, that is, if I can find some that I like.


Friday, February 3, 2012

REPAINTING, REFINISHING, and RE-TILING

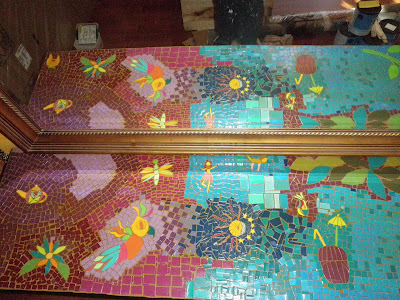
Repainting, Refinishing, and re-tiling the sideboard is today's mission. Above and below are shots of the sideboard before the make over. My children and I made this mosaic out of cut up paint chip samples. The problem with those, however, is that they roll up and I did not anticipate this. I used construction paper before for similar project and that worked well.   


I was a little sad to cover up my children's artwork, but it just would not fit with my new, and much calmer, theme.
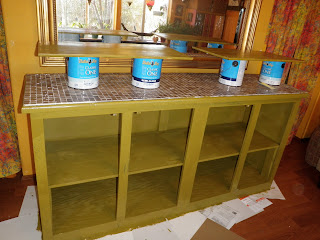
Above is a view of the front, before the refinishing. Below is the "in progress" shot.


As you can see, all the colorful art is covered by glass tile, which I snatched for only $ 3.98,- at LOWE'S. The paint is by Dutch Boy, which has a build in primer. I will put on the second coat today, and tomorrow I plan on refinishing the front of the doors.


Wednesday, February 1, 2012

Mirror Furniture

Mirror furniture are back! If you have browsed through some of your local high-end furniture stores, or if you been at Pier 1, T.J. Maxx, or even Ross', then you have seen the mirrored vanities, coffee tables, end tables, and night stands. The problem with those pretties is that the mirror pieces easily get damaged. One time of accidental bumping into the said piece can ruin your entire investment since these furnishings will cost you a pretty penny. So why not make your own? Except you want to use small pieces and use the mosaic technique. This way if one of them get damaged, you can either life with it (since it want be so noticeable), or carefully replace the damaged piece. The picture above shows one of the two closets I am working on. I have to finish the other two closet doors today and then the adhesive needs to dry for 48 hours before grouting. After that, I wills sand and repaint both closets.
Also, I made a Walmart trip yesterday, because I ran out of Mirror tile, and I was surprised to find that the prize for a 6pack of 12x12 mirror tiles are only $ 8,54.- rather than $ 9.99.- which I had quoted you all yesterday.
 Here is another example of what you can do with mirror tiles. I my youngest daughter's bedroom- some 'free-form' walart with which she happily helped. Tomorrow I have some more to show you. YES, I am a sucker for mirrors ;)

Tuesday, January 31, 2012

Mirror Tile Mosaic


Mirror Tile Mosaic is not only for flowerpots and small ‘futsy’ (my term for small cutsie stuff) things, but can be used on walls, furniture, and structures like posts, outside daybeds, and the facing of steps/stairs. Mirror Tile is easy to get, easy to use, and inexpensive. You can buy Mirror Tiles in any home improvement and hardware store, but I found that WALMART, consistently, has the lowest prize, about $9.98. -   The tiles can be used whole or, as in this case, cut into the desired size and shape with a glass cutter

 Above: this is a glass cutter (the other end of the cutter is a metal ball, designed to know against the glass AFTER cutting it, to make the break). These little tools are available at any hardware store like LOWE'S or HOME DEPOT
 Above: Omni Grip is the adhesive that I like to use. You could buy a cheaper MIRROR TILE MASTIC, but I also often work with tiles and heavier pieces, which are kept from sliding down by using the stronger OMNI GRIP.
Above: This is a puzzle, but you decide what shape and size the puzzle pieces are, and what the puzzle looks like ;)
 This is a Tupperware gadget I use to 'butter' the back of each tile piece. Doing it piece by piece, rather than spreading the adhesive onto a large area on the wall, art, or furniture, gives you better control and allows you to take breaks or resume project at a later time without risking the adhesive to dry before applying the tile. I also have used small paintsticks, old butter knifes, and old credit cards, they all work well for mosaic tiles.
 Since the adhesive tends to dry out when not in use for a few weeks, or months, I like to use a piece of plastic wrap, which I press directly onto the adhesive before I put the lid back on for storage, this keeps it from drying out.
 When starting my 'Puzzle,' I like to find pieces with finished edges and finished corners, it makes for a cleaner and more professional look in the end.

 If you like a 'wilder' look, you can also use a hammer and simply smash them. This gives you a lot of sharp-pointed triangular pieces. I recommend to do this in an old cardboard box to keep the pieces from flying everywhere.
 Sorting your tile/mirror pieces makes the process easier.
 Mirror tiles are sharper than ceramic tiles when broken or cut, so be careful that you do not slice your fingers, especially if you like to work without gloves. ALSO, no matter if you use a hammer, or glass cutter, there are a lot of tiny sharp splinter which could cause injuries, so clean up and using protective measures are very important. Shake out any towels, blankets, paper, etc. outside in an area where no one walks bare foot.
Enjoy being creative with your Mirror Tile Mosaic!

Monday, January 30, 2012

From BOLD & BEAUTYFUL to calm & serene

COLOR OVERLOAD

As I have proclaimed before, I love color, but after 10 years of bright orange, red, fushia, gold and sunflower yellow, I am ready for a change. I want to lighten, brighten, and De-clutter. I started by moving our HUGE couch into the family/kids/work-out-room and moved the futon from there to the living room. I must say, after only one evening of sitting on this thing, I am determined to find a more comfortable seating solution as soon as I can afford it. Until then, this will have to do. Here are some "Before" shots.
 This colorful large couch was in my living room, but it goes well with the existing color scheme of the "Play room!" 

 Here is the less than comfortable futon, now in my living room. As you can see, there is a lot of space left on both sides, which is the space the big colorful couch filled before.
 Here are my hanging oriental lanterns, which I still love, but will find other homes for them in my bed room and in my garden, possibly also in my bathrooms. This is a good idea not only because it is pretty, but it comes in handy when the electricity goes out, which happens from time to time here.
More on my living room make-over tomorrow, until then--choose JOY!

Saturday, January 28, 2012

THE CHOICE

So, after creating the blog title and hitting the 'create' button, I noticed that my German background led me to misspell "Rent," since I really meant to write "RANT."  And like so many people would, I too, ranted about it for a bit, but than it came to me: "This is exactly my point, it is a choice." I smiled and chose joy! Another funny foe-pah in my "Tire Garden" story was the fact that I made a 'Sweat Potato' out of the Sweet Potato! When my 19-Year-old daughter Alina pointed this out to me, I broke out laughing. You have to be able to chuckle at yourself and stop taking yourself too serious. Lighten up, you live longer and have more fun and less wrinkles. ;)

Friday, January 27, 2012

And so it begins...

Hello Anyone and Everyone!
Allow me a short introduction. My name is Martina and I was born and raised in Berlin, Germany and I am the proud mother of 9 awesome children, the proud 'owner' of one husband, and grandmother of 2 rambunctious little boys. I am 48 years old and have often been 'accused' of being too blunt, hence I nicknamed myself "The Mean German." I am speaking what is in my heart and am pretty transparent. Raising 9 children on a shoe-string-budget, combined with the engrained philosophy of my German Grandmother to 'waste not, want not,' yet having expensive taste at the same time, I have learned to be very creative and inventive. I am passionate about color, gardening, and creating energizing, yet soothing and healing environments. I am very opinionated on certain subjects, but also like to explore new lines of thoughts and experiences. Since I am at home for the last 10 months, with more time than I had been used to in the past, as well as the fact that I often find myself 'teaching, motivating, and encouraging' an imaginary audience, I finally decided to make these 'talks' available to anyone who would like to benefit from them.  

This here is my amazing family, and as you can see, I truly do love color!

Since there is snow in most regions of the country, I thought I cheer you all up with some of last year's shots from my garden and a little advice on how to keep your dogs, (we own a sheltie,  named KILLER, by my son Rocky) from using your prized plants as a cooling resting place in the summer: Collect glass bottles and stick them upside down into the soil around the plants that you are trying to protect, it looks prettier than stakes and the animals will not bother your plants anymore. (Most people think of wine bottles, but Syrup bottles from Torani, or Vinegar bottles, etc., work just as well). You can also fill the bottles with water, sand, gravel, glass pebbles, and the like, BUT you have to watch out for freezing temperatures as this will lead to shattering of the bottles.


The story of the MONSTER TOAD:
This 'little' guy came into being because of my son Rocky, his faith in me, and a resin toad that had fallen in love with at SHOPKO, but didn't want to spend the $90,- !!! Little did I know then what I was in for when my dear son decisively declared "You can make one yourself mom, and you can make him much better and bigger than the one at the store. I help you." What he actually meant was: I help you pay for it. Well, we set out to get what I thought we needed. two straw bails, one roll of wire-mesh, and 12 bags of cement (at 80 pounds each). I started by putting down one whole bail of straw and surrounding it with the wire-mesh, shaping it into a toad-like body. Then I filled in the spaces with loose straw and proceeded to slab cement onto the top. That was an experience! The cement does not want to stay in place easily, I had to mix it to a real thick consistency in order to aid the process of keeping it from sliding down. That, however, made the concrete dry too fast and I had to work quickly. Easier said than done. Add to this the extreme weather changes here in Yakima, Washington--from warm and sunny, to freezing rain and stormy winds, only to change to blistering hot a day later. Because of all these unforeseen, and unplanned for, circumstances, the toad grew, and grew, and grew.... Another 36 bags of cement later, I was ready to put the eyes on the body. out of the leftover pieces of wire-mesh, I crudely shaped the eyes and attached them with wire ties to the body, than proceeded as I did with the body. Last, I made forms out of aluminum flashing for the feet and filled with cement. Then came the winter, and the next summer, I covered the beast with small tiles and glass pebbles. It took almost 2 years and came out MUCH bigger than I had originally intended, but it was a fun experience and has given me great, and fun memories with my son.


Moving the veggie garden!
I don't know if you are married to the same species that I am married to, but this hubby of mine will not believe my advice easily ;)  When we moved to West Valley and started our gardening life there, we had to truck dirt in, because the land we bought was mainly rock and weeds, but mainly rocks. So of course money was a huge consideration, but so was speed if we wanted to get produce that year from the garden, I always say to spend a little more time, effort, and money in the beginning (DO IT RIGHT THE FIRST TIME), and less time and money later, but NOOOOO, I was "being unreasonable." Did any of you out there ever find yourself in a conversation like this with your loved one? Ha, ha, NEVER, right? :D  Well, after having his way, meaning throwing the nice freshly delivered dirt, wheel barrow by wheel barrow onto the weeds (without killing them first or some kind of weed block underneath) and battling the weeds growing in this garden for 8 long years, my dear man was finally ready to listen. So we moved the garden onto cardboard and weed-fabric (about a 100 feet away from its original spot), closer to the part of the property that gets a lot of water run-off from watering my flower beds, since we live on the side of a hill.
In order to save on watering and weeding while at the same time save money, I talked hubby into making a couple of trips to the local tire stores where we got everything for free we needed: Truck tires, car tires, and even a few Tractor tires. We filled the tires with soil, and filled the walkway with gravel. We had a fantastic yield of strawberries, tomatoes, bell peppers, hot peppers, sweet potatoes, beans, leaks, onions, herbs, and more. My husband spend more time in this veggie garden just for fun and much less time weeding and watering. He gratefully admitted, after grumbling throughout the whole process, that he had lost his joy of gardening and not only got it back, but has never before loved as much as he did now. WOW, now that is what I call success ;)